DIY Floating Shelves With LED’s
I have a few leftover cherry boards from my Barstools episode that would be perfect for this project. The final thickness of the shelves is just over an inch thick, so the rough 8/4 cherry will work simply fine. Since the only part of the shelves you will see are the edges, I did not get too fussy when laying out the parts on the board. Let us get started making floating wall shelves today!
List of Materials
- (2) 1.125″x 5.75″x8.5″ – Shorter Horizontal Board
- (2) 1.125″x5.75″x9.5″ – Vertical Board
- (2) 1.125″x5.75″x20″ – Longer Horizontal Board
Step by Step Instructions for DIY Floating Shelves
1) Breaking Down Rough Stock & Milling
Starting with the Jig Saw
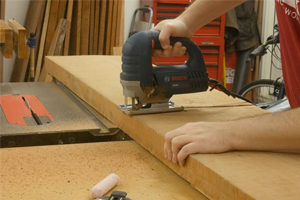
I am using my jigsaw to break down the cherry board because it is too broad to cut on my miter saw. Next, I rip the parts to a rough width at the table saw. The final width of the shelf parts is 5 3/4”, so I set the saw fence to 6” so I can have a little room to clean them up after milling. And finally, I cut the parts to a rough length with the miter saw. The smaller the boards, the faster it is to flatten them at the jointer.
Get A Flat Surface
Speaking of the jointer, I flatten one face and then place that face up against the fence to get a 90-degree edge. With one flat reference face, I ran them through the planer to take them down to a thickness of 1 1/8”. With the boards milled to their final thickness, I take them over to the table saw and cut them to width, and then, using my miter gauge, I cut them to length.
2) Cutting the Miters!
What Joint to Use?
The joinery method I chose for the shelves was miter joints. A more accessible alternative would be to use a simple butt joint with screws for reinforcement. But for mine, I am using miters that will be reinforced with loose tenons. The top and bottom shelf parts only have a miter on one end, whereas the vertical board has a miter on both ends, so it is worth taking a second to mark the boards so you do not get confused when cutting them at the table saw.
Tilt to 45°
To begin cutting the miters, I tilt the blade to 45 degrees. I use a magnetic angle finder to help me make sure it is tilted 45 degrees to the table. With the stop block set, I cut the miter on one end of the shorter board. I am using a stop block because I am making two shelves. This allows me to make sure both shelves are the same size.
Next, I reset the stop block for the vertical piece that gets a miter on both ends. And finally, I cut the single miter on one end of the longer shelf piece.
3) Design Elements
The shelf is done if you want to stop here.
But now, I will add a few design elements to make them look better. The first design element I added was a chamfer on the ends of the top and bottom pieces. I installed a 45-degree chamfering bit at the router table and gently removed waste (raising the bit) until the chamfer looked pleasing to my eye. To help tear out while routing the end grain, I am backing up the piece with a scrap board.
LEDs
The second design element, if you will call it that, is LEDs. The shelves will have a groove routed down to the center of the inside faces. The LEDs I am using are battery-powered, so no outlet is required. To route the groove, I first measured the width and thickness of the LED strip to determine which router bit to use. The strip I bought is three-eighths” of an inch wide and a little under a one-fourth” thick. So, I installed a three-eighths” spiral bit over the router table and set its height to one-fourth.”
Making Space for the LEDs
Now, the grooves on the top and bottom boards will stop grooves so that I do not plow through the ends of the boards. I made a mark one” from the edge. This will help me line up the cut. My router fence has two marks, one on the left and one on the right side of the bit. This will help me when I line up the mark on the board with the line on the router fence. I line up the marks and slowly push down on the board, and once it is flat on the table, I put forward pressure on the board to route the rest of the groove. However, the vertical board has this groove from end to end, so there is no need to line anything up.
4) Reinforcement & Bracket Hardware
Since the miter joint is an end-grain to end-grain glue joint, we must reinforce it. I will use loose tenon joinery that is cut using the Festool Domino.
- An alternative to using the domino would be miter keys or splines.
Bracket Hardware Installation
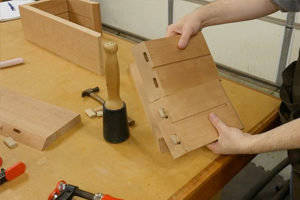
Now, I can start marking the back side of the shelves for the mounting hardware. I am putting the hardware on the longer boards because they will have the heaviest items. To begin, I mark five inches from each end of the board. Next, I find the center using a combination square and make another mark. This mark tells me where I need to drill. I chuck up a one-half” bit in my drill press and drill a 4 1/2” deep hole. My drill press could not drill that deep, so I had to finish with my cordless drill.
Next, I need to route a three-fourths” groove so that the hardware will be hidden and the shelves will sit flush against the wall. I have seen some folks skip this part and leave the hardware proud of the shelf, but I will hide it.
I make a mark two inches to the left and right from the center of the hole. This is going to be the entire width of the groove. I made mine a little wider than the bracket just in case I need to move it around a little on the wall, as the brackets are adjustable. But if you want to make your groove a little shorter, go right ahead. I often over-plan projects like this.
To make the groove, I use my plunge router with an edge guide installed and a three-fourths” straight bit. I line up the bit and plunge one-fourth” at a time until the groove is one-half” deep.
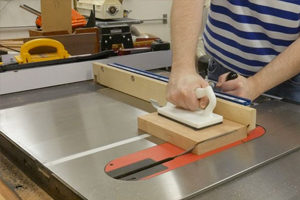
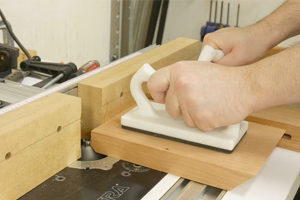
5) Surface Prep & Finish
Next, I hit the edges of the boards with my smoothing plane to remove any marks, and then I switched over and sanded the surfaces using 120, 150, and 180 grit sandpaper on my orbital sander.
Pro Tip
To help prevent the glue from getting on the surface, I put some masking tape on the boards right up against the miters. When the glue dries, I can pop the tape off, and the glue squeezes and comes with it.
Time to Glue
Speaking of glue up, I can now start that process by putting glue in the domino holes and then on the miters. This is a straightforward glue-up; it is a three-sided box.
I put a few clamps on the shelves to help pull everything together and ensure the corners were 90 degrees to one another.
For the finish
I wiped on three coats of a wiping varnish using a cotton cloth. They will not need much protection, so I stopped after three coats. I sanded between each coat with 320 grit sandpaper.
6) LED Installation
After the finish had dried, I installed the LEDs. The LEDs I purchased are adhesive-backed, so it is as simple as pulling the paper off the back and sticking them into place. But before that, I ran a trial to see where to cut the LED strip. The strip has indicators letting you know where you can safely cut it.
With the strip cut to length, I pulled the paper off the back and pushed it in the groove like I did during the trial run. And now we are ready to mount the shelves!
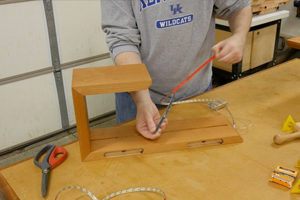
7) Hanging the Shelves
The hardware comes with wall anchors, but the screws are too big and cause the anchors to spin in the wall. So, I bought eight self-tapping wall anchors at my local hardware store.
These will hold plenty of weight for a couple of shelves like this and are super easy to install. I also bought replacement screws.
I then made a template to help me figure out where to place the holes for the brackets. It is just a cut-off from the longer shelf board. It is the same length and width, which is perfect for this. I drilled a few holes, so I had to measure fifty-four inches from the floor, throw a level on top of the template, and mark the holes for the wall anchors. A French Cleat would be another way to hang these shelves, but because of the material needed for the cleat, they will not sit flush against the wall and will detract from their beauty.
Installation
You do not have to use a hammer to install the anchors, but I like to tap the anchors right up to where the threads start. You can use a screwdriver, but I like the control a hammer gives you. Since the template gives me the location for all four holes, I installed the other three wall anchors.
Next, I put the washer on the screws and mounted the bracket. I left the brackets a little loose to level them up before tightening them.
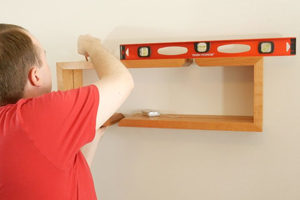
With the brackets installed, I slid the shelf into place. The brackets are adjustable if your shelf is not flush against the wall. The top of my shelves was not flush, so I adjusted it, and now it is perfect.
To install the second shelf, I placed a level on top of the first shelf and scribed a line across the shelf on the wall. Now, it is as simple as placing my template against the line and making marks for the wall anchors. I installed the four anchors and brackets before putting the shelf in place.
And…Done!
And the shelves are finally done! I love the shelves’ modern look; the LEDs are nice. This design is excellent because you can rearrange them to form different shapes, like an S, or keep them in this rectangular position. The cherry will be beautiful when they age a little in a few years.
- I hope you enjoyed this one.
Did you like this building? Our blog has many more DIY builds from Simple Cove and other builders, so check them out. Let us know in the comment section if you want to try this project and if you would make any changes to fit your home. Do you like the tools in the video? Check the Acme Tools website for all the tools and get the one you want on sale or clearance. Now get out there and start building, and do not forget always to do your best work.