
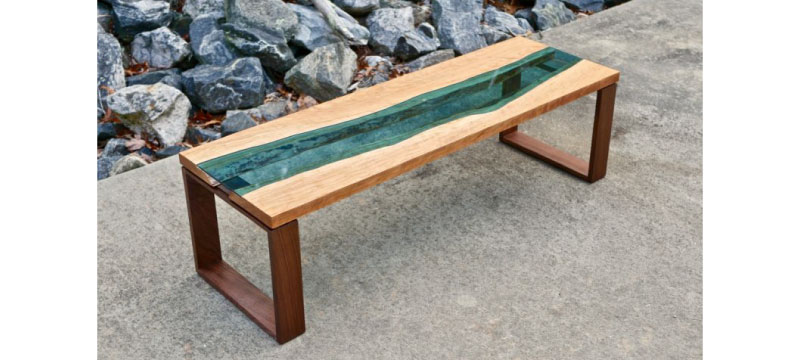
DIY Walnut And Steel Table
This walnut and steel conference table build (which could also be a dining table) was my most involved woodworking project, including drawbored breadboard ends, processing rough lumber, panel glue-ups, and more. The build also included a welded steel base using 1″ square tubing.
Tools Used
- Metal Cutting Saw
- MIG Welder
- Belt Grinder
- DEWALT Angle Grinder
- Drill Press
- DEWALT Miter Saw
- DEWALT Planer
- 8″ Jointer
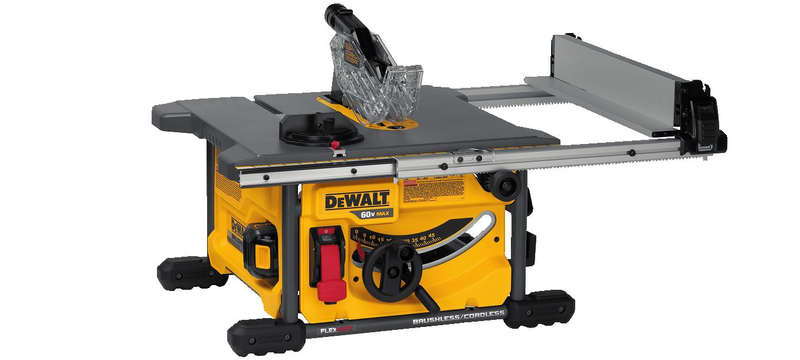
- SawStop 1.75HP PCS Table Saw
- Festool Domino XL
- DEWALT Plunge Router
- DEWALT Track Saw
- Laguna 14|12 Bandsaw
- Bosch Random Orbit Sander
- Bosch Hammer Drill
Get Started with the Metal Table Base
The first step is to break down the steel tubing for the bases. I needed roughly (8) 10-foot lengths of one” 16-gauge square tubing. The dimensions of the final bases are seventy-six” long, twenty-six” tall, and eighteen” deep. The bases will have three” casters installed. When breaking down steel like this, it is a great idea to use gang cutting, where you cut multiple pieces at once. This results in pieces that are the same length. After cutting the pieces, I gave them a quick grind on the belt grinder to remove any burrs that might get in the way of welding, and then I moved on to welding the bases together.
To assemble the conference table bases, the first section I assembled was the top apron. This top section comprises two long rails connected by three shorter rails. These are all simple, 90-degree welds. Weld the four corners, and then add the center short rail. Next, weld the legs together. A stretcher holds each leg together to keep the legs rigid. This stretcher is six” from the bottom of the legs. After welding the legs, I ground down the welds since it is much easier to grind them now while they are flat on my work table.

After assembling the legs, attach them to either end of the top section of the base. Welding magnets are helpful if you work primarily at 90-degree angles. When the legs are secured, the next step is to add the long center stretcher. This will add lateral stability to the legs. This is welded to the center of the leg stretchers.
The last structural piece on the base is the center support piece. Since the span of the bases is so long, there was a small amount of flex in the bases without this piece. If you are using thicker steel, this will not be necessary, but I thought it was a clever idea to add it to my bases. Attach this piece to the center short rail and the bottom long stretcher.
The final metal pieces to add to the bases are the brackets, which will be used to attach the bases to the walnut tops. I made these from an 11-gauge angle iron. If I had to do it repeatedly, I would try to find 16-gauge angle iron since welding the two differing steel thicknesses was tricky.
When drilling the mounting holes in these brackets, I used a bit that was about ⅛” larger than the screws I used to attach the top. You must add this small amount of wiggle room for the wooden tops to expand and contract seasonally. In total, I welded seven support brackets on each frame. After welding, I ground down my welds with a flap disc and then prepped the surface for finish by wiping it down with denatured alcohol. Any surface contaminants will affect your paint adhesion, so be thorough here.
Let Us Move to the Walnut Tops
This was my first project using rough-cut lumber. I bought this pile of air-dried walnuts off Craigslist about two months ago and have had it acclimating to my shop since then. I sorted through the pile and picked six boards to make up my tops.
This walnut is 5/4 thick, a little over an inch, and varies in width from six to ten inches. My jointer has a max capacity of eight,” so, on a few of the pieces, I had to skip plane the boards, join one edge, and rip off the waste material on the table saw before being able to fit the piece on my jointer. I got lucky, and all the pieces except for one ended up fitting my jointer after cleaning them up a little bit. I had to rip one of the boards in half to fit it on the jointer since it was about a foot wide, even after cleaning it up!
I ended up dimensioning my boards in two stages. In the first stage, I brought them from rough down to about a one” thick. I then let them rest for about a week in case they wanted to bow or warp on me, then brought them down to their final dimensions, ¾” thick.
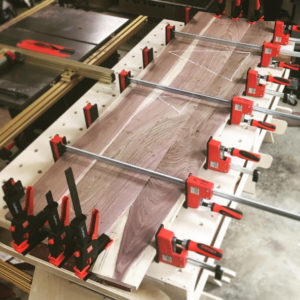
It was time to join the boards after the boards were to their final dimensions. Like the bases, I built two separate tops for this conference table. Each top is twenty-two” wide by eighty-four” long, with breadboard ends on each top. To join the boards into a panel, I used a Festool Domino XL. This was my first project using the XL, and I must say that the efficiency I gained was incredible.
The first step in the panel assembly is to lay out where to cut the mortises for Dominos. This is also an excellent opportunity to make sure your boards are gap-free. If they are not, pass them over to the jointer again. The last thing you want is gaps in your final tabletop.
If you don’t have a Domino, you can use a biscuit joiner to glue the panel. The biscuits or Dominos do not add structural strength here; they are just for alignment. If brave, you could even forget any alignment pieces, but this is risky. The boards want to slip along the glue line when gluing up panels like this. Some kind of alignment aid, whether Dominos, biscuits, or dowels, is beneficial.
For the glue-up, you want to make sure you have plenty of clamps available. Apply glue along the entire joint, ensuring your pieces are gap-free, and apply clamping force. You want an excellent line of glue squeezed out along each joint. Give the glue about 30 minutes to dry and scrape off any squeeze-outs. It will be much harder to remove once it is dry. After your panels have finished setting up, trim the ends square. You can use a circular saw with a straight edge or a track saw here. You want to ensure the ends are perfectly square, so take time laying out your cuts.
Creating the Breadboard Ends
Once the ends of your conference tabletops are squared up, it is time to figure out how you will install your breadboard ends. In my case, I am once again calling upon Domino XL. The tool quickly creates the mortises for the breadboards. If you do not have access to a Domino, there are many options for installing breadboard ends. You can use a router to create a mortise and tenon joint, cut a sizeable sliding dovetail, use a tongue and groove joint, and even use dowels if you cut some of them loosely to allow for movement.
The whole point of a breadboard end is to allow the top to expand and contract during the changing seasons while keeping the ends of the top flush. The tops will mostly move horizontally, along their width, not the top’s length. To account for this movement, breadboard ends need to have some path for this movement to occur. When you see people installing breadboard ends using pocket holes, this is a recipe for disaster. The top will not have room to move, which can lead to cracking.
The Domino makes this easy, as it has two settings for cutting the mortises: tight and loose. For breadboard ends, you cut tight mortises into the top and combine tight and loose mortises into the breadboards. For a great explanation, check out Brian McCauley’s video on using a Domino to install breadboard ends. I will have a link to this in the video description.
With the mortises cut into your top, glue in the tenons. Once you have installed the tenons on the top, transfer these lines to the breadboards and cut your mortises into the breadboard.
I decided to draw my conference table’s breadboard ends onto the tops. This process uses dowels to pull the breadboard ends tight to the top. You accomplish this by drilling holes in the breadboards and then drilling holes in the tenons. When you drill the holes in the tenons, you drill the hole about 1/16” closer to the top. One note on drawing breadboard ends: you also want to widen the holes in your tenons to allow movement. You can see me rocking the drill back and forth to widen the holes.

When you pound in the dowel, this misalignment will pull the breadboard towards the top. To help guide the dowels in the holes, I slightly sharpened the ends of my dowels to help them go into the offset holes.
Another trick to help with this is to use a drawbore pin, a tapered steel shaft that helps clear the holes before installing the wooden dowels.
When installing the breadboard ends, you only want to add glue to the center Domino or center of your tenon. The top movement will occur around this center section, allowing the rest of the top to expand and contract. You should not apply glue to the other tenons going into the breadboard.
To install the dowels, pound them until about one-half” protruding above the surface, then apply a small amount of glue. This glue should not make it to the tenon; you want it to hold the dowel in place so it cannot accidentally push through the top. Once the dowels are pounded home, trim them flush using a flush-cut saw.
With the breadboards installed, you can trim them flush. I leave my breadboards slightly extended to allow for any misalignment during installation. I cut my flush using a track saw and a table saw.
Applying the Finish to the Walnut Top
With the conference tabletops at their final size, it is time to prepare for the finish. I filled any knot holes or surface imperfections with Timbermate, a water-based wood filler. After filling any holes, I sanded the top with eighty-grit sandpaper and then chamfered the edges of the top and bottom using a router and chamfer bit. I also slightly rounded the corners with a file.
I continued working through the grits, going to 120 and finishing with 180. Once I finished sanding, I wiped the tops down with mineral spirits since I used an oil-based finish.
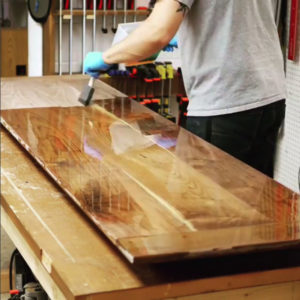
For the conference tabletop finish, I am using General Finishes Seal-A-Cell for my first coat and following up with three coats of General Finishes Arm-R-Seal. There are some differing opinions online about whether Seal-A-Cell is necessary, but General Finishes claims it can help to bring out the grain on highly figured wood, and I would say that I agree. The grain on the finished tops is incredible.
You do not stand after applying the Seal-A-Cell and move directly into using the first coat of Arm-R-Seal. After applying the Arm-R-Seal, I sanded it with 320-grit sandpaper. An effective way to know whether the finish is ready for sanding is whether it becomes chalky like this. That means it has dried enough to re-coat. After sanding, wipe down with mineral spirits again and apply another coat. Repeat this process as often as you want until you get the results you are after. Three coats left me with an excellent finish.
The last part of this build was figuring out how to attach the casters to the steel tubing. Plastic threaded adapters are available for this, but the ones I found were surprisingly expensive, around $8 each. I figured I could make them myself out of scraps instead.
To do this, I measured the inside and outside dimensions of the tubing and cut some rectangular blocks slightly larger than the outside dimensions. Once these blocks were cut, I cut a small amount from each side at the bandsaw so that they fit inside the steel tubing. I picked up this little trick from Laura Kampf’s steel dining table build, and it worked out perfectly. Once I cut the plug, I drilled a hole in the bottom to fit the caster’s stem and then epoxied the plugs into the bottom of the legs and glued the casters into the plugs. Last, I attached the bases to the tops using ¾” machine head screws and then added two latches, one at each end of the table, to keep the two halves together.
With that, the conference table is finally done!
–Johnny Brooke of Crafted Workshop created the Video and Blog Post with Acme Tools. Check out more of Johnny’s work at Crafted Workshop.
One Comment
Richard Robertson
June 20, 2017 at 4:20 amHi, Johnny Brooke It’s an amazing video. Actually, I’m a particular woodworker but I never make it before so I wanna make it for my job.