
Everyone remembers the fun of running through the sprinkler on a hot day. So many hours of fun was derived from a tool that was never intended for kids. But it’s 2021, and we have the technology to improve on the wonderful invention of the sprinkler. Just in time for the mid-summer heat, we have the perfect project that will keep the whole family busy through the holiday weekend, a DIY kids sprinkler. Here’s our guide to building a do-it-yourself sprinkler made of PVC.
Tools
Materials
Eight 10-foot pieces of 1/2-inch PVC Pipe
PVC Fittings (11 elbows, nine tees, four 4-way connectors, and a garden hose connector)
Painters Tape (Optional)
Drop Cloth or Cardboard (Optional)
Spray Paint (Optional)
Pool Noodles (Optional)
Misters (Optional)
DIY Sprinkler Instructions
Before beginning your PVC sprinkler build, ensure you have all your tools and materials. Running back and forth from the hardware store is the perfect way to turn a project into a chore. Many steps in this build are optional; they each add to the project and provide flair to what would otherwise be a drab white pipe system. You can always add your own ideas as well.
1. Cut the PVC Pipe
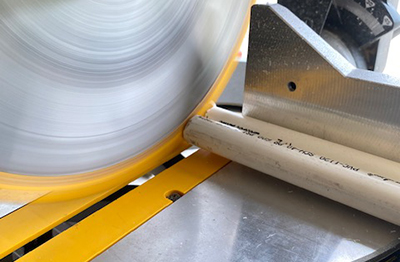
- Measure seven of the 10-foot PVC pipes into 30-inch sections.
- Measure the eighth PVC pipe into 29-inch sections.
- Use a PVC pipe cutter or a miter saw to cut the pipes at the marked spots. (Be sure to save the leftover piece for later from the eighth pipe for later)
- You should finish with 38 30-inch and four 29-inch pieces.
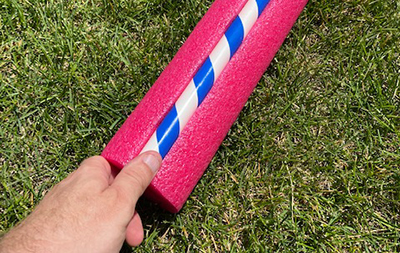
2. Paint the Piping (Optional)
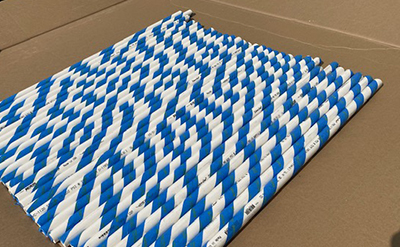
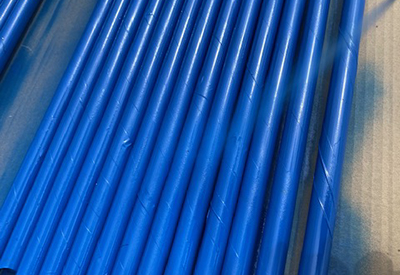
Painting isn’t a required step, but it will give the project a little more pop, and it’s fun for the kids.
- Apply painter’s tape at a 45-degree angle to one end of each piece of piping and wrap it around in a candy cane pattern until you reach the bottom.
- Layout the taped pipes on either a drop cloth or a large piece of cardboard.
- Spray each piece with the spray paint, being sure to coat any exposed space evenly. (Apply light coats and go back over the pipes once they dry. If you apply too much at once, the paint will run, and it’ll look sloppy.)
- Once the pipes dry, roll them over and paint the other side. Let dry
- Repeat these steps until the pipes are completely covered.
- Remove the tape once the pipes are completely dry. The dry time depends on the spray paint, but typically, it’s about 15-20 minutes.
3. Lay Out a Design
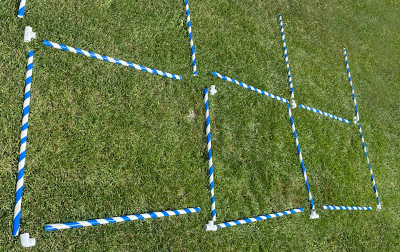
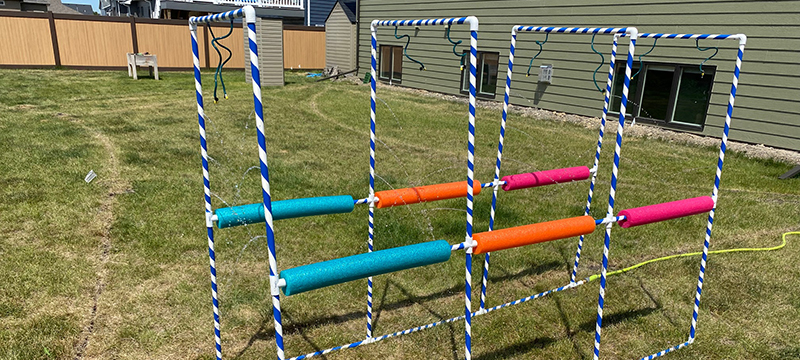
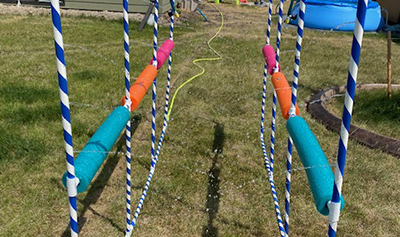
Lay out a rough design of each sidewall. For this specific build, there should be three across the bottom and middle and four 2-piece vertical sections. Also, lay out the fittings in specific places to ensure you have all the correct items.
Each side should match with one side having an open 4-inch extension on the bottom for the garden hose connector that will be attached later.
- Design Tip: You can make the design smaller if you like, which will help with the water pressure. The larger the structure, the less pressure will go through the system.
4. Connect Fittings and Pipes
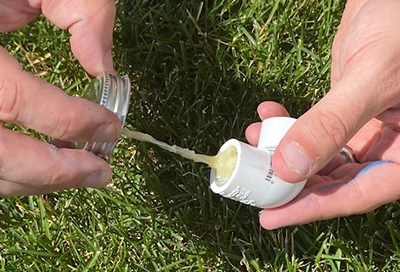
- Join each fitting to the pipes using PVC cement. Do this in a well-ventilated area to prevent inhalation of the cement fumes.
- Be sure to attach the garden hose connector to the 4-inch extension.
- The cement should be applied inside the fittings, and the pipes pushed into them.
- Let the cement dry for 15-20 minutes before moving on to the next step.
5. Drill Sprinkler Holes

During this step, use a 1/8 drill bit to drill the holes. You can use a smaller or larger drill bit if you like, but it will affect the water pressure either way. The smaller the hole, the higher the water pressure.
- Measure every six inches on the top portion of the vertical sections of each sidewall. Drill the holes at each mark.
6. Add Misters and Pool Noodles (Optional)
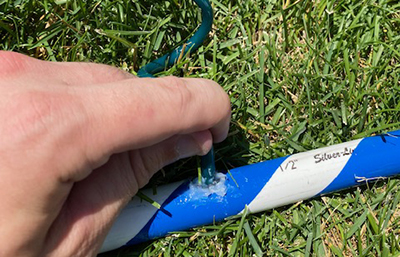
This step is purely to add to the look of your DIY sprinkler and can be skipped entirely.
- Measure the diameter of your misters and drill holes that are one step lower in size. Drill 6 inches apart in the top section of the sprinkler.
- Insert the misters in the drilled holes. This may require using a rubber mallet, depending on the style of your misters.
- Tip: If the misters are loose, use a clear caulk to fill the gaps around the base. This will ensure you have a tight seal and no water escapes during operation.
- If you forego the misters in the top section, you can use the 1/8 drill bit and drill holes similar to the vertical sections.
- Cut the pool noodles into 27-inch sections.
- Use a utility knife to cut the sections vertically.
- Slip the sections over the middle horizontal pipes on each sidewall.
7. Finish the Top Section
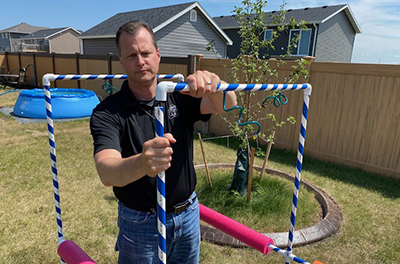
This is the final portion of the build. The top section shouldn’t be glued, so it can be easily removed when the sprinkler isn’t in use. This way, the project can be broken into sections and easily stored during the winter.
- Stand the sidewalls up and attach them together using the top horizontal sections.
You’re done. You can test the system and spend hours of fun running through the DIY sprinkler with the family.

2 Comments
Patrick Finn
June 6, 2023 at 9:48 amThe project “How to DIY a Simple Sprinkler Using PVC Pipes” is a great project.
There is one miscalculation, however. You will need 10 10′ lengths of 1/2″ PVC pipe – not 7 as mentioned in step 1. Each pipe, if cut into 30″ lengths, will yield 4 pieces [10′ = 120″ / 30″ = 4 pieces per 10′ length]. Four x 7 = 28 total pieces when the project calls for 38 total pieces.
Otherwise, a great project!
Ryan
June 9, 2023 at 10:21 pmYou only need 28) 30” pieces. Look at the pictures of the pipe laying in the grass…14 pieces per side. Also the material list calls for 8 total sticks, the 8th being used to make 4) 29” pieces.